Showing posts with label computer tips and tricks. Show all posts

Sunday 16 February 2014

How To Add Pattern Lock For Windows!

Pattern Lock
After the smart phones are become popular, the pattern lock system had impressed many of the users. The main reason behind this popularity is, it becomes the trend in the today’s locking system. And also it had replaced all the traditional locking systems which used several usernames and passwords. And the next successful step of the pattern locking system is, it is now introducing for the computers on various operating systems. Several softwares are introduced for applying it in the windows systems by using different patterns.

The following are Pattern Locking Software 


Ø XUS PC Lock

Ø Eusing Maze Lock

First we will discuss about the XUS PC Lock.
 
One of the very good pattern locking software is XUS PC Lock. Once you have downloaded and installed the software in your computer then you will be taken to define your pattern to lock your system.

Then you can choose your pattern as per you wish in the following square formats such as 5x5, 4x4 and 3x3.
Initially your lock will be chosen as “z” pattern in all of the points.you might think that how to make a pattern on screen to unlock in the computer, for this you can use your mouse to make the pattern to unlock your system.. After making the definite pattern locking system. You will be able to backup the pattern lock in your system. Hence you need not worry if you have forgotten your pattern for unlock your computer.

You can access many features of XUS PC locking software by accessing the settings.

Some of the features of the XUS PC lock software are shown here 
 
Ø Here you will be enable and disable the Auto lockingsystem at the windows starts up.

Ø In this, you can even set the timing for the automatic lock.


Ø The three modes in which you can set the locks are given below

1) Secured unlock mode

2) Normally unlock mode

3) Dynamically unlock mode.

Ø The Dynamic unlock method will protect you from the key loggers.

Ø You can also able to lock keyboard of your personal computer to avoid unwanted issues on your computer..

Ø Here you will be allowed to set a custom locking background and even you can set a transparent background to your computer.

Ø This software will work fine on windows systems preferably in the windows 7 and windows 8.

Ø The important thing you should notice, this software will not make any changes in your default locking system of the windows. 


Now we will have a look on Eusing Maze Lock 


This Eusing Maze lock also consists of all the features of XUS pattern locking software. This tool can download from the internet for free. Hence this tool is also similar to XUS lock it can be used in the windows systems. The additional feature here found over the XUS lock is it works better even in the windows XP.

Saturday 15 February 2014

Download Angry birds for pc


Angry Birds
We all are well aware of the angry bird game and moreover most of the people were addicted for that game.The angry birds is a game which was developed by Ravio Mobile limited. This is initially made for the smart phones which work on android and ios operating systems in later days it was developed for other smart phone devices. This angry birds game has been recognized as the top developer application in the Google play store. The number of users who are downloading this game from various website is keeping on increasing day by day. In this article we will see how to download this game and how to install it in the computers or laptops.

Enjoy the angry birds game in your computer by following these simple steps.

First of all you should have theblue stacks application in the computer you are using. You are allowed to download it from the internet for free.

What is BlueStacks?

BlueStacks is a window installer that it used to run android application in the windows operating system. In this BlueStacks, you are allowed to install various android application and also BlueStacks acts as a app runner for the android applications. By using the BlueStacks, you were allowed to install and use the application as like in your android devices and also you can create an virtual environment in your personal computer as like an android device.

Installing and using Bluestacks:
 
v After finishing download of Bluestacks. Just make a double click on the bluestacks
 
v Then it will start installing in your computer automatically.
 
v Here you can sync your mobile app or game in PC by using cloud connect
 
v You can avail this option by hitting the settings on the right end.
 
v Once you click the cloud connect. Now make your registration by entering your email id and mobile number. Then a pin number will be provided to you through your mail. 
 
v Now get the bluestacks app in your android mobile and install it.
 
v Then open the app, here it will ask a pin (which is sent to your mail while you are registered), just enter that pin number.
 
v Then you can sync your game or app from your mobile in your PC.
 
· Now open the bluestacks and you will be seeing the screen shown below.

· Here hit the search icon and start searching angry birds as given below.

· Then by clicking the “install button” the game will be downloaded and installed in the bluestacks.

· Now you can find the game from “My apps” and starts playing it.

· Once you need to uninstall the game just make a click and hold it for some time. Then hit the cross mark.

Thus you have successfully installed the angry birds in your personal computer with the help of BlueStacks application and also if you have any other method other than this, you can definitely ping us through the comment box.

Update Your Facebook Status In Your Language

Update Your Facebook Status In Your Language
It’s the time for you to update the status of your Facebook, twitter and even sending the mails in your own languages. This article provides you necessary information on how to updates your social networking status in your language.


By using these technique, not only you can update your Facebook status you can also avail other usage in the internet such as writing content for the websites, writing articles for the blogs, status for other social networking sites. In these days it is becoming a trend in making the social media status updatesand which also bring impression over your status because all of us having much interest in seeing our own language in the web. Yup, now we will start this tutorial on how to make Facebook status in your own language i.e. other than English.

The first thing is you should have the Google chrome web browser because the chrome is the only web browser which allows you to update status or writing content in the web in your own language. For updating the Facebook status of writing content in other language by using Google chrome browser you need to download the “Google input language tool” from the Google chrome store

Once you finished downloading the “Google input language tool” from the chrome web store you need to install it in your computer. After finishing the installation you can be able to find the “Google input language tool” icon in the right side top corner of your Google chrome web browser, i.e. it will appear besides the URL address bar of your web browser. Now just make a click on that and choose “theextenuation option” once you made a click over it, it will redirect you to another settings page which will allow you to add your own language to the “the Google input tool chrome application”. And then h ere you can add any number of languages as you wishes. After you finish adding the languages to your extensions you are strictly advised to restart your web browser to utilize the power of extension.


In order to update the status in Facebook by using your own language of your wish, just follow these simple steps given below

For an example we will see for Tamil language.

Ø First login your Facebook account by using Google chrome web browser.

Ø Click the extension button from the top of the browser.

Ø Then select your own language

Ø It will open a pop up as writing pad in the bottom of the web browser.

Ø Then type your status with the pencil provided.

Ø Here the status will be updated which was written in your selected language automatically.

Ø Finally press enter once you finished your work.

Note: this facility of updating the Facebook status in your own language is not available in the Mozilla Firefox web browser.

How to Open or Access Blocked Websites at Schools, Colleges and Office

Access Blocked
In this world, almost every place has the internet access. But in some places we use internet with some restrictions like schools, colleges and offices etc. i.e. they will block some websites like orkut, facebook, twitter in order to maintain the discipline among the students. In order to access the blocked websites, here we provide the tips.

Instead of using website URL, use IP address 
 
In schools, colleges and offices, they use software to block which mostly blocks the websites only rather than IP address. For example www.twitter.com etc. so we can use IP address to unblock the blocked website. Each and every websites has its own IP address. If you want to know the IP address of the particular website, you have to do the following process.

Run->command Prompt-> type “ping domain.com”

Instead of typing Domain, type the Website that you want to know the IP address. For example ping facebook.com. Then the IP address will be displayed. Just type and run the IP address.

Use Proxy manually in Browser
 
Most of the browsers support the proxy IP addresses manually. You can access the Blocked websites and browse whatever you want. There are so many proxies are available in internet itself. So you can get it through internet.

By setting manual Proxy using Mozilla Firefox
 
Ø Firefox browser-> option->advance network tab->connection settings

Ø Manual proxy settings window will open-> enter proxy address-> save

Ø If your computer won’t support the Proxy, you can use the alternative one.


Redirect the Blocked website with URL Shorten Service
 
URL shortner site is used to convert Long URL to Short one. But this site tends to go through the security settings. Tiny URL, MooURL URL are the shortner sites.

Use VPN software 
 
VPN software is available on both free and paid versions. It allows you to surf enormously, by just downloading the software and installing it on computer. Some of the VPN software’s are listed below.

Ø ProxyXPN

Ø Hotspot

Ø Tunnel

Browse using TOR browser
 
Except the social websites (facebook, twitter.) you can access the remaining blocked websites. In social websites you have to save the cookies. So can’t access it. TOR browser is used to hide the online identity.

Use Decimal Code
 
We know the method to unblock the website by using IP address. Suppose the software is not accessed by using the IP address, we can use the decimal code. It is a simple method as same as the first method. When the IP address is displayed you have to convert it to decimal value.

Use Hola extension
 
Hola extension is a browser which is available in all browsers. It is used to surf internet more. You can download hola in the hola’s official website itself.

Use Wayback Machine
 
Wayback machine provides the copy of the websites once the websites have been started. You have to type the website URL and select the latest copy of wayback machine.

Saturday 8 February 2014

How To Check If Email Is Opened Or Not!


Yahoo and G mail
As many people would have noticed that, while sending some message via a Facebook, What’s Up when delivered or read by a particular person will status as seen and you can make a confirmation that message was delivered successful. Have you ever had a confirmation status while sending an email? Think so yet now you would have not. And also to make a note for you this feature is not available in Gmail or Yahoo.

Email conformation indeed is not that important till it’s needed to be. For instance when you send some important mail for your family, boss or client, you have to hang around till recipient has received the mail. This case will not be favorable at times and if recipient fails or ignores to send an reply you will surely be in a confused state whether mail is reached or not. So in order to deal with such situation, we will get notified you on sent email.

1. Using Right Box Chrome Extension: 

• By using Chrome extension Rightinbox you can track the sent email.

• On the first you have to install extension on your browser.

• Now open up inbox, if already opened then refresh it.

• Now Pop arises in screen, click the continue button and give access to Rightinbox to contact Gmail.

On completing these steps compose mail recipient and clack on to Track, send the mail. Once the recipient have opened and read your mail, you will be noticed with IP address and location. Hence this is also accommodating you o schedule Emails in future. Further support is Rightinbox send tracking email not based on extension browser. So you will get notification when you access tour mail from any other computer.

2. Banana Tag: 

To track sent mail form Gmail and yahoo anther technique is Banana Tag.

• Do you have an account in BananaTag; else you have to sign up for a new account.

• On completion of registration, you can get BananaTag extension for your browser.

The extension to your browser provided was a free version and you can rack up to only 5 mails per day. If you need to track more than 5 emails per day, all what you have to do is upgrade your account by crediting BananaTag.

Hence this an way to find out status of sent email. Try out and enjoy the new experience.

Wednesday 29 January 2014

How to Speed Up my Windows 8 PC to Work Faster - 10 Tips

Windows 8
I must say that windows 8 are faster that windows xp or windows 7, whether it’s the booting time or the performance, Windows 8 is ahead of all its previous versions. Are you facing slow issue with your windows 8 ? Its mainly due to lot of unwanted things running in the background or installation of too many apps. Lets see how we can make it work faster than before. Its easy to speed up your windows 8 pc. Below are some tips which you can try to speed up your windows 8 pc.

Remove/Disable Unnecessary services

You can remove/disable unwanted windows services which may be making the pc slow, to perform that

• Press Win + R to open RUN Window, then type the command msconfig in the box and Press enter.

• Now the box opened is System Configuration .In that Window navigate to the Services tab. Tick the checkbox of the Hide all Microsoft services, it will hide the windows services. Now the left upon services are third parties like Adobe , Google, Mozilla etc.These are actually unwanted services which might be eating up lot of resources, uncheck those services and click apply.

Manage Your Startup Programs

• Open the run command and type taskmgr to open the task manager window, navigate to the Startup tab.

• Now you can see lot of programs list which are installed in the pc, select the unwanted apps which you don’t want to startup along with system startup and disable them, now these apps won’t be starting along with system, you can manually start them anytime.

Disable Time-Wasting Animations

Windows 8 uses lot of animations while opening, closing windows, We can disable them.

• Open the run command and type SystemPropertiesAdvanced and press enter, It will open System properties With Advanced Tab. Click on the Setting button in the Performance section.

• Now in the Performance Options Window go to Custom, you will find a lot of effects which are ticked, untick them and apply.

Stop Windows Indexing

• Open the run command and type services.msc, press enter. Look for the Windows Search service in the list, right-click on it and select the option Properties.

• In properties Window, select the start up type as Disabled.

User Recommended Anti Virus

Instead of using third party antivirus programs, Use the Windows included Windows Defender , it’s the same antivirus as Microsoft Security Essentials.

Modify Power Settings

Windows 8`s power plans are same as earlier version of windows. To view the power plan settings, press on the Windows key, in the box type Power Plan, click Settings, and press Enter. Make sure you are using it in Balanced mode which is the recommended one.

Put Your Computer To Sleep

Instead of shutting down the computer put it in Sleep mode, In sleep mode the system goes into a low power state which consumes a very low power to keep the programs active. Using Sleep instead of shut down gradually increases the pc speed.

Optimize Your Hard Drives

In the earlier versions of windows there was a tool called Disk Defragmenter, its named as Optimize Drives too in windows 8. Though Windows 8 optimizes the drives once in a week automatically, it will be good if you make it twice a week.

Registry Cleaner: 

Actually people install and then uninstall lot of programs in the pc, even if you uninstall the program it leaves behind registry files which will remain in the system and after a period of time it can cause slowness, You need to cleanup these registries using a registry cleaner.

Install Latest Drivers : 

Always make sure you install the latest drivers for your hardware’s, if the hardware’s are updated your pc is sure to work better.

Monday 27 January 2014

How to Lock your Windows PC or Laptop with USB - Extra Security

Lock your Windows PC or Laptop with USB
Have you ever imagined that you can use your USB drive as a lock to your desktop or laptop? Yes that is possible, it is such a fun thing that the USB drive will be acting as a key to your pc, if you remove the USB drive the system will get locked until you insert it again. Here I will tell you how to do that. It actually works through software called Predator. This kind of security lock is very significant and cool.

There are two links for this: Firstly the trail version Predator and the professional edition Predator. You can download it from these links. This trick works on all the versions of windows including windows 32 bit and 64 bit

Here are the Steps to lock your pc with USB: 

• Download the Predator software from the links mentioned above.

• After downloading the Predator software, connect your USB Drive to the system that acts as a key and then run the software for installation.

• In the mid of the installation you will be getting a pop up message asking for the password. You can enter the password which you want to set and then click OK to continue.

• You will get a pop up window for Preference settings, you can select your language, multiple monitor settings etc.

• Now add the USB Drive to the software by selecting the drive under Flash Drive settings and then click on the key it will generate a key on the USB device which will be used by Predator to monitor.

• You will be now able to see the Predator icon in the taskbar of your pc while the Predator program is running. The trial version of Predator offers usage for 1 month and its for non commercial usage only whereas Professional Edition has all the features and its completely for commercial, professional and single computer use.

• This Predator can even alarm on a high sound if someone enters invalid password that makes it very safe from strangers.

• It also records a activity log, by reading the log you can come to know whether somebody else tried to login to your pc.

When you remove the USB drive from the PC, the keyboard and mouse are actually disabled and the monitor screen darkens and when you are back just insert back the USB drive it will release your mouse and keyboard.

It's easier and faster for restarting your Windows session, and you do not have to retype your password again. Even if you lose your USB drive, you can use the password you have set while installing the software to unlock your pc, It also has a feature of sending alert emails to your mailbox and messages to Twitter. And last not the least PREDATOR can protect multiple desktops and laptops with the same USB flash drive.


I hope this will be useful for you so add an extra layer of security to your pc in a fun way.

How to Fix Blue Screen Error in Windows


Blue Screen Error in Windows
Blue Screen Error is a common issue that can be found in the Windows 8 and Windows 7 operating system, and is also called as Blue Screen of Death and it will make us to feel uncomfortable with the operating system. It will makes us to feel uncomfortable when we are working over the Desktop, and also when working with more important files.

Generally what is Blue Screen Error? 

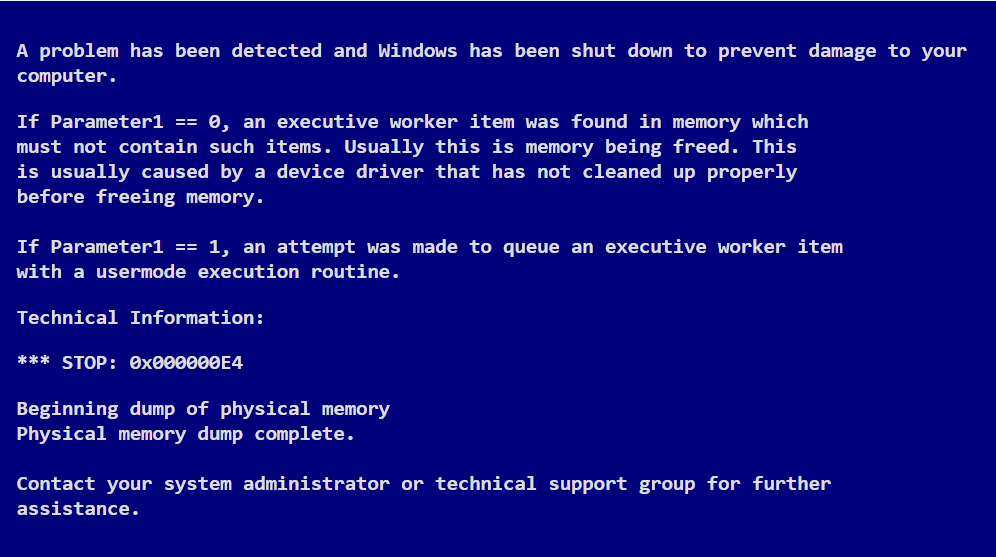
The Blue Screen Error is termed as an Error message which will be provided for the users to denote the critical issues that are going in your personal computer. If a serious problem occurs in your Windows 8 or Windows 7 operating system, then the Blue Screen Error will occur. It also shows you the message that states, Windows has been shut down to prevent the damage to your computer.

There are few severe problems that might happen in the hardware of the system or also with the drivers of the hardware. The Blue Screen Error can occur due to various reasons in the system hardware and also caused due to some software changes in the system.

In this post, I have shared a bit of information regarding how to fix the Blue Screen Error in your personal computer or in your laptop. Various reasons for the Blue Screen Error have been given below;

Problem with Your System Registries and its related items: 

Blue Screen Errorare also caused due to the various issues which are happening in the system registries, and if the problem exists, and also you can use the system registry cleaner to fix the issues which are related to the registry. Most of the people use the utility software to clean up the registry issues with your operating system.

Problem in Software programs: 

The Blue Screen Error is also caused due to the some issues which are related to the software that are used in your personal computer. If you have experience a Blue Screen Error after installing new software, then the software is responsible for the Blue Screen Error. So you can easily remove those installed applications in your personal computer to rectify the Blue Screen Error in your windows 8 and windows 7 operating system. You can uninstall the application by simply accessing Control Panel -> Add or Uninstall Programs -> uninstall the software package which you doesn’t need and also the application which cause Blue Screen Error in your personal computer.

Bugs in Software applications can cause Blue screen error. If Blue screen appears after installing new software, then restart your system and try to uninstall it and see if this solves the problem.

How to Avoid the Blue Screen Errors: 

1. Always use original edition of software to prevent Blue Screen Error and also avoid the pirated editions of the software. 2. Disable unwanted software program, this will provide reduce the Blue Screen Error in your personal computer. 3. Shut down your system properly,alwaystries to shut down properly in your personal computer. This will absolutely prevent the Blue Screen Error.

How to Dual Boot Windows 7/8 and Ubuntu

Dual Boot
Most of the people around this globe has own their personal computer and they can easily complete their various works by easily using their personal computers. The technology has made their life more portable, the laptops have been made their work more portable and they can easily use their laptop for various kinds of task.In this modern world of technology, we use operating system such as Windows 7/8, Mac OS and also many of the people use Linux Operating system. One operating system has a feature which doesn’t found in the; if anyone wants to use both operating system in their machine, then this post is suitable for you. In this post, I have shared information regarding how to boot dual boot in your computer, and here it go;
Steps for Dual Boot (Windows and Ubuntu)

Here you can found the various levels of steps for dual boot your personal computer with Windows Operating system with the Ubuntu.

Step 1: Open your Browser from the Windows operating system, and open the Ubuntu Website.

Step 2: Download WUBI from the Ubuntu website, and click on the Get the Installer in the Menu.

Step 3: Once you have clicked the Get the Installer over the Menu, you will be asked to select the various options and you will be asked to pay $2 for each services that you need to be installed in your personal computer.

Step 4: Now you need to slide down everything to zero (0), and then proceed to download.

Step 5: Now you will be asked to download the files which sized as 2.4MB and click the download files.

Step 6: Download the file and double click the wubi.exe and select yes to proceed.

Step 7: Now start installing the Ubuntu in your computer, provide the installation size to 18GB and select the environment as Ubuntu and select user account, provide user name and password to login into your windows account.

Step 8: Click install and it takes more than 15 minutes to install the Operating system in your personal computer.

 Step 9: After the Ubuntu operating system has been installed in your personal computer, restart your computer and wait for the Boot menu. You will find a menu which shows, Windows and Ubuntu Operating system to boot.

Step 10: Now just click your Operating system as Ubuntu by simply clicking the down arrow button in your Keyboard, this will select the operating system as Ubuntu in your personal computer.

Step 11: Now you need to select the packages which has to be installed as an additional packages in the Ubuntu Operating system, after selecting proceed to install. This will take few more minutes to install.

Step 12: Now you need to enter the username and password for your Ubuntu operating system, this will lead you to the Ubuntu operating desktop screen.

Now you have successfully booted the dual operating system in your computer successfully.

Wednesday 22 January 2014

How to Access Computer with Android Mobile or iPhone

Access Computer with Android
In this world of technology, everything is possible with the help of these technologies. Most of you have tried to connect with your personal computer from the mobile and would have failed. But there is a fantastic way to connect your personal computer with your mobile very easily. In this post, I have shared an information regarding how to connect or access your files in your personal computer from the mobile itself. You can access the pictures, images and as well as the music files remotely from the mobile.

The best solution for this is easily done an application called PolKast. This application is a best application which can be installed in your mobile and by using this application; you can access the pictures, videos and music from your mobile.

Polkast is one of the best cloud services and it is fantastic; through which you can easily create your own personal cloud service with this mobile application itself. By using this pilkast application, you can select any size of file on your personal computer and you can share them using polkast applications. By using this polkast, you can easily access the files which have been shared in the polkast application, from your mobile itself. This polcast application can be also applicable for the Tablets and you can access those shares files from the tablet too.

In order to make the polkast app to work perfectly, we have to install the server app on the personal computer which you want to share and also the client application on the mobile device which may a mobile phone or a tablet. You can easily download any of these application from the polkast websites very easily for totally free of cost.

Steps to Remotely Access the Computers from your mobile:

-> Step 1: The first step is to download the PolKast in the personal computer where you need to share your files and access it from the mobile.

-> Step 2: Go to PolKast website; In the website, click over the Desktop option which is shown over the PolKast website.

 -> Once you have clicked that image, it will leads to you to the download page. Download the server version for your computer and install the application on your personal computer accordingly. Install the application in your personal computer and run the PolKast server app on your personal computer.

-> Register your account on the PolKast and once you have registered in the PolKast website. You will be directed to the main screen on the PolKast application, where you can choose various files from your personal computer which you need to be get remotely accessed from your mobile phones.

-> Now download the PolKast application in your mobile phone, and install it in your mobile phones.

 -> Once you have successfully installed the PolKast, you were asked to login in thePolKast.  

-> This will shows you the dashboard screen for your account, in which the shared files can be accessed from your mobile phones.

How to make your own Folder Icons in the Windows XP operating system

folder
Windows XP operating system is one of the best operating system which is installed in most of the devices in this universe. Because of its simplicity, the Windows XP operating system is considered as the best operating system in the world. You can even notice that the people who were using the Windows XP operating system would never go for the latest upgrades of the Operating systems. Because of the ease in the Windows XP operating system, the people used to stay in the Windows XP operating system.

There few tips that can be still used by the people who were using the Windows XP operating system. In this post I have share a bit of information for the Windows XP operating system, and in this I have discussed the steps how to make your own folder icons in the Windows XP operating system.

Generally, we used to store different kinds of files and informations in the each folder. But the thing is that, the icons for the folder will look similarly. If you were changing the icons according to the kinds of information which are stored in a folder, then we can easily access the informations very easily and quickly too.
The steps are given as below;

Step 1: Right click over the Folder which you need to change the Icons in the Windows XP operating system. This will show you pop-up menu in the screen.

Step2: In the pop-up menu, select the Properties in the Menu.

Step3: In the property window which you have selected, click the customize tab in the menu and also click on the change Icon button.

Step4: After clicking the Change Icon button, the pop-up box with series of icons and pictures is available for you. You can click on the any image you want and you can select the icons to be the Folder Icon for your Folder. This helps you to choose the Folder icon in the Windows XP operating system.

How to add extra Icons on the Icon Menu: 

If you want to use a custom image as your icon in the Windows XP operating system, you have to add your image in the %SystemRoot%\system32\SHELL32.dll.

-> In order to make your image as a custom icon, select an image which you want to make as icon. • Open an image editor application on your personal computer.

• Now crop the image into the size of 24 x 24 pixel or 16 x 16 pixel resolution in the image processor.

• Now save that image into 24-bit bitmap image from the image processor.

• Now repeat up to step-3 in the folder, and then you need the click on the browse button near the top of the image.

• You have to choose the image which you have changed into the bitmap format. Then select Ok button. Finally you have changed the custom icon in the Windows XP.

How to Connect All your Computers with Single Mouse and Keyboard

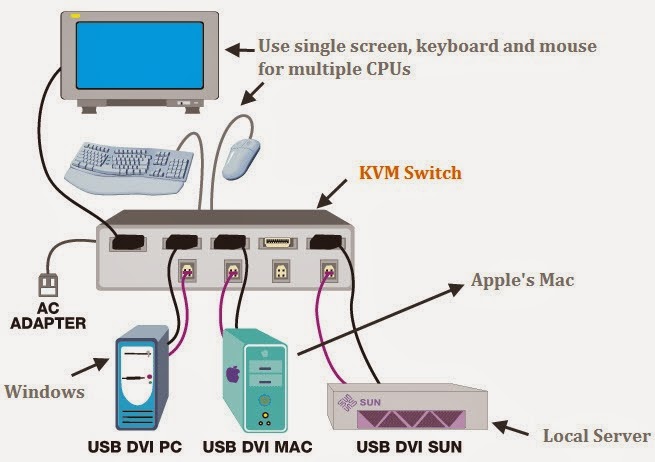
KVM Switch
Nowadays it’s a common thing having multiple Systems in their home like a Desktop and a laptop, Even there are a lot of people who work with two or say multiple desktop computers and its hectic to work with two mouse and two keyboards, Did you ever heard that we can actually operate multiple computers using a Single mouse and keyboard? Yes that’s possible using various methods, So here are a few methods which we can try to overcome that.

This can be done through hardware and software either ways but the important thing is the computers should be connected to each other via LAN or any Network connector.

1. KVM (Keyboard, Video, Mouse) switch, its hardware or say a cable in specific which will be a short one for keyboard, video and mouse. These are actually commonly used in Datacenters where lot of servers are placed in a single rack with a single keyboard, monitor and mouse. It will let you share a single mouse, keyboard and monitor across two or multiple computers. There is also KM switch cables using which you will be able to share a single keyboard and mouse with two computers that have two separate monitors. The best thing about using these hardware cables is they give really fast connections which makes it worth to go and makes the work more efficient. One of the main advantage of using KVM switch is that it saves space which would have been occupied if multiple keyboards, mouse are used.

2. If you don’t want to add any hardware cables there are a few software’s too which we can try, First thing to try out is Input Director, which is a Windows-only utility that’s easy to install and is totally free for non-commercial use. At first, you need to install this Input Director program on all your Computers. The computer that is physically connected by keyboard and mouse becomes the Master computer whereas the other systems will be Slave computers. Just make sure you never shut down the Master computer without turning off the Slave computers first because by doing that you will lose access to the keyboard and mouse which are physically attached to the master computer. There`s another program called Synergy , this one is a bit harder to setup than Input Director , but it’s free and a open-source thing which supports Microsoft windows, MAC OS and Linux. Both these programs are small ones which won’t eat up much resource your computers. On using both the software’s you don’t need to press any switches or buttons which was there in the case of KVM switches. Simply just move your cursor to drag drop or copy paste across your multiple computers in a easy manner. 

People who don’t mind spending for a peaceful computing will love to go for the hardware way and the Users who don’t like to spend money and want a clean desk without messing with cables will go the software way. Happy Computing.

Saturday 18 January 2014

Top 3 Dreadful Computer Security Threats

Security
In this world of technology, there is nothing which has been created without any kind of its own threat. Even we people have some things which are very dreadful and dangerous to our health. The main thing which is beneath that is if we people do not know what things are harmful to our health, then we wouldn’t able to avoid those dreadful things. And this phenomenon is also applied to each and every personal computer which has been produced. In this world, there are few things which are more extremely of great danger and that is reason behind that is we need to be careful with those things. In order to avoid those things, we people need to know each and everything about them and what they are.

In the world of computer we need to know about the following things; 

Virus

Till now, the greatest dangers to the computers are the virus. These viruses are already available on each and everywhere and when they intruded on the personal computer, they may do lot of damage to the personal computer. These kinds of viruses are updated regularly based on the operating system updates so that, they can easily cope with the various threats that are posed by any anti-virus software. So, it is also necessary for us to have the anti-virus software updated and so we can avoid those kinds of threat which are posed by the anti-virus. It is strongly advised to use good anti-virus and never used to forget to update the anti-virus software.

Hackers

From the day when the computer has been invented, hackers are the major threat for the safety of the personal computer. The hackers use our personal computer to perform their different kinds of dirty work, and those that fall victim of their dirty tricks will always has a story to tell to other peoples. Most of the works done by the hackers are fun of producing and them so call viruses just to hurt other personal computer files and important documents. Although in some time, hacking sessions are seems to be very important. But those kinds are activities are used by the governmental activities and termed as White Hat Hacking. And most common hackers are only renowned for their evil things.

Unauthorized Users

Unauthorized users are considered as the major threat to the world of personal computing. The main reason behind that is they can able to destroy the important files which are found in your personal computer and which leads in loss of some important files in your personal computer. Since they are not the owner of our personal computer, they will create damage to the important things in our pc. It’s our duty to be careful of these kinds of people because they will harm our files as well as they bring anonymous changes to our personal computers.

If any other computer security threats are known by you, then share those threads with us through the comments below.

How to Increase Internet Speed and Fix DNS Errors


Google Public DNS
Almost everyone has come across this problem in your personal computer, The Webpage is not available. Yes of course, this phrase will make us to feel bad when we see that thing. In most of the times, you would notice that DNS look-up failed. You can easily speed up your internet speed by changing the perfect DNS. Even you have a better internet connection; sometime you would end up in very slow internet connection. This is the reason of bad DNS setting for your personal computer or for your laptop. Before changing into the ways, you need to know what actual DNS do is.

Actually, DNS stands for Domain Name System, which allows you to connect with the various web servers. It is a actual address assigned to each and every web hosts that are available in the internet. If any one of those gets failed, at the time you were opening that page, then you may experience this DNS look-up failure. Suppose, if you were going to open the Google webpage. The DNS of the Google is not opening and it fails to resolve it, then it will lead to DNS look up failed.

In this case, you can ask your ISP to check up the DNS problem or else you can choose the third party DNS address for surfing. This will provides you more faster internet connection when compared to the other default DNS address. In the following steps, you can learn how to set up a Third party DNS address in your Windows operating system. Before changing into the public or third party DNS, make sure that your ISP supports these kinds of Public DNS. If you change into the public DNS, then you can easily experience faster internet with nice security features.

Steps to Change the DNS setting: 

• Go to the Control Panel in your Personal Computer

• Then, click over the Network and Internet in the Cpanel. Then Click into the Network and Sharing Center.

• Select the Internet connection that you want to change the DNS. Right Click on the Internet Connection and Click on the Properties.

• In the Property Menu, click over the Internet Protocol Version 4 i.e., TCP/IPv4

• Now click on the Property Button, it will gives you a pop up window with few text boxes. Look for any DNS which is already given, that may be used for any future references. Write it down and they can be replaced if your new DNS is not working.

• Click on the DNS and Change it into 8.8.8.8 and 8.8.4.4, after that click ok.

• Now restart your connection and as well as the personal computer. Now Start internet with more speed and performance.

How to Download Torrents on Windows Symbian and Java Mobile


Torrent on Mobile
Downloading files in the internet is becoming a common thing in this technology era, and you can easily sort out different kinds of files in the torrents sites and easily download from those sites. But the main thing that we need to consider is that, we need a bit torrent client while downloading a torrent files in a website. We can install this client in a click, if we are using a personal computer or else a laptop. But in case of mobile phones, the torrent client’s availability is very less. Nowadays Smartphones has so many applications in order to download a torrent file from internet.

In case of android mobiles, you can download the torrent files by using the applications that are available in the Google Play store. But in case of the Java and Symbian mobiles, the case is some difficult while compared to android mobiles. But in this post, I have sorted out the various applications for the Symbian and java mobiles to download the torrent files, and finally provide you the best source among those apps.

Downloading a torrent files in the Windows Mobile is very easy and here it goes;

How to Download Torrent Files in the Windows mobiles: 

Since Windows mobile has its own style and standard, they provide lots of applications for their mobiles. And they offer various levels of applications for their mobiles, among those applications, the Wp torrents is one of the best torrents file downloader for the Windows mobiles. In this case, you can easily download various torrents files with files and applications from the mobiles. Wp Torrent is a best torrent client which allows you to download torrents files of any sizes from your mobile itself.

Features of Wp Torrent: 

1. Wp Torrent allows you to download various levels of Music, audios and it also comes with integrated Music and Video Playback system.

2. Wp Torrent has both Free and Paid Versions, the Free versions allows you to download the files at the speed of 200KB/s and by using the Premium versions, you can download as much you can with unlimited speed.

How to Download Torrent Files using Java Mobiles: 

MobTorrent is a good Java application which can be used for downloading the torrents files. The MobTorrent provides a better options and features for downloading the torrents files from your java mobiles itself. By installing this application, you can download the torrent files in any of your java mobiles.

How to Download Torrents files in the Symbian Mobiles: 

If you are a Symbian user, then don’t worry. You can easily download the torrent files in the Symbian mobile very easily. SymTorrent is an application, which can be used for downloading the torrent files in your Symbian Mobiles. SymTorrent is available for free of cost in the internet and you can download this application from the internet. SymTorrent lets you to download the torrent files as much as you want.

Thursday 16 January 2014

Basic Computer Maintenance Tips

Computer Maintenance Tips
In our personal computers, various levels of taking simple steps to maintain the quality of the personal computer can enormously and efficiently extend its lifespan. Instead of throwing money for replacing the hardware components, it is also possible to benefit from computer by maintaining it by the following steps will save your money in a larger amount. In this article I have shared little information about the basic computer tips which will improve the performance of your personal computer. And by following these steps, you can also prevent the failure of the computer and prevent the damage of file system too.

Make sure that you have Copies of Everything

It is must to copy the files which are more important in your personal computer and make it a copy in another drive for better support. Back up a file is an important phase in the computer maintenance process and it is a basic element too. Suppose if you lost anything, then it will helps you by providing those important files. While restoring or repairing a computer, it may result in wiping the data present in the device. So it is necessary to take back up of those files which are more important for us. It is strongly advised to use an external hard drive to store all kinds of necessary files in your disk, so you can use them whenever you want.

Clean your computer

Cleaning your computer will provide more speed to your computer. Presence of several unwanted files will reduce your performance of your personal computer. If your personal computer is affected with the viruses, then it will reduce the performance of your computer. So using of several anti-virus applications will remove the unwanted files that are affected by your viruses in your personal computer.

Don’t Clutter your Computer

Dumping files in your personal computer will reduce the speed of your computer and you can easily improve the speed of your personal computer by removing unwanted files in the computer. By keeping the memory 50% free will increases the speed of the computer and you can easily improve the speed by removing the unwanted application files, movies, music, etc… present in your personal computer.

Reorganize your files

Reorganizing of files allows you to experience a speed on your personal computer and you can enjoy the speed of your machine by reorganizing files in it. The computers will always store the files in the chronological order when it is stored and this way of storing the files will reduce the speed of the system. So it is necessary to reorganize the files which are stored in the personal computer to gain the speed of your personal computer. You can easily re arrange the files which are present in the partitions and also it is very easy to store in it an order. This process can be easily done and also with the help of the various tools we can arrange the files which are found in your hard drive. You can even use the defragment option to arrange the file in an ordered manner.

Maintain your Computer Regularly

Performing these easy maintenance steps on a daily basis can improve the performance of your Computer/laptop with none expense or any real issue. If you're facing issues with applications or viruses then it is very wise to seek Computer/laptop support because as a result small problems will become a larger one if it is untreated.

Tuesday 10 December 2013

Desktop Computers: Tips, Tricks And Other Great Advice

I need looking for a pc to be simple! I had want to acquire a pc which neither exceeds my needs nor falls short. I do not need to overspend my budget both. What can I really do to ensure I get an ideal device? Read this post in full, obviously!
Consider an audit of the uses for a pc prior to purchasing one. This is necessary so you can definitely comprehend just how much power you actually want. More energy means more cash. If superb strong desktop will not be of any actual use to you personally, why spend the added capital?

Cloud Data Access in Houston TX

We live in an age of technological advancement. Recent innovations now allow you to access a range of information at any time and from any location. As long as you have access to the internet, you can also have access to anything you need or want. This remains true for your business's important information. With a web-based server from MBS, you can have simple cloud data access anywhere in Houston in a few clicks of a button.

Houston TX: Virtual Server

Having a virtual server allows your Houston business to store all of its information, programs and data to a completely web-based cloud system. Instead of keeping all of this information backed up on physical servers or in on-site computer storage, everything you need is accessible via a program that you can log into through any internet browser.

This proves beneficial for any on-the-go business owners that find themselves needing to access information from a variety of locations.  From your home desktop, to your mobile device, you can conveniently keep up with your business in the midst of a busy or hectic schedule.
If you desire a fresh pc, appear online. The web has so numerous deals and choices, you are certain to locate a pc that's both within your budget and does everything that you require it to do. The one thing you must remember would be to compare costs from various companies so you are receiving the top bargain. If you're not a gamer, do not get suckered into gaming desktop computers. These computers are souped-up against the largest and baddest video cards, sound cards, and processors. If all-you do is e-mail and light images, this energy is major overkill. You could be better spending your money on an inferior pc and purchasing certain peripherals.
When seeking a fresh desktop, go into it with the thought to optimize your purchase based off of the particular needs. Desktop computers can be found in a lot of designs, sizes, and processing speeds and capabilities. There's a huge assortment, therefore it is crucial that you have a glance at your workflow to make the most effective selection based from you. Do not get deceived into an even more expensive product than you need.
If you're aiming for longevity from the desktop computer purchase, do not settle for the minimal specs offered. Those specifications might be great now, but in a year, you might be in for an unpleasant surprise. Your pc may get dated fairly fast if you're not attentive. If cash is really a concern, even just a small bump to your own memory can become a huge help. If you're able to, choose for a desktop computer which has peripheral connectivity in front part of the case. Many computers now have at least two USB ports accessible within leading. This could save lots of difficulties whenever you visit plugging things in, particularly in case your background is hidden from view.
Consider how you need to utilize the pc. Do you want it for working from home, or is it likely to become a family computer? If you're purchasing the pc for family use, consider what the necessities of the other family members are. You'll have to understand these things while shopping for your own pc. For those who 've gotten a raucous family or you also are inclined to be awkward yourself, actually do consider getting insurance in your desktop. You'll here-some folks say insurance is just a waste of money, however in the instances where you know accidents occur too frequently, you really have to protect yourself.
Avoid scams when buying a pc from a private seller. While they might assure you a quick, working computer, you will not know whether it is accurate before you analyze it. Insist on having the ability to see it in actions using a screen, mouse, keyboard and internet access at least.
Learn when the pc you desire has included programs. You should understand what they're. You should know whether it got a word-processor or spreadsheet program you will use. This is necessary to many because of their work. In Addition, learn if the applications included are complete versions or demos. The demos expire after 30 or 90 days, which require that you purchase the complete versions yourself.
You can now make looking for a brand new pc simple. You can obtain an ideal machine that's as simple or complicated as you require it to be. Your financial plan will stay intact through the procedure too. All because of reading this post in full!
If you want easy, on-the-go access to your business's virtual server, contact MBS by clicking here!
We proudly serve companies in Houston and the surrounding areas, including Harris County, Texas.