Thursday 23 January 2014

Top Benefits of Archiving Files in The Cloud

Cloud
Businesses that are of various sizes, which are operating across all the sectors, can gather large quantities of data on everyday basis. From monetary reports to email exchange, these files are very crucial to retrieve and contain highly sensitive data and information, which cannot be compromised. It is important that the company has a file archiving system at a place. This archiving system allows storage of large data; the data present on it should be accessible and secure. Looking for file archiving system Cloud storage is the solution that the businesses can choose for a cloud based storage solution or a on-site file archiving system.

Drop Box, is ranked fifth among all the cloud storage alternatives present in the world which allows easy access on any device. There are various similar services present in the market. Otherwise you can go for an online virtual storage like the Google drive. In this article we outline the various advantage of the cloud storage.

Cloud Archiving Drives Down Costs

A cloud-based solution is much more cost effective than an on-site storage solution. Why? There because there are a few certain reasons. A cloud-based solution eradicates all the dedicated internal IT resources for archiving of data. But when an on-site solution is considered, the role an IT employee is that he spends most of his time dealing with file archiving issues but this is not the case when cloud based solution is considered. The cloud-based solution has a larger scalability feature. Where we only pay for the processing, bandwidth, memory applications and the needs of an business organization and there is no hidden payments which is incurred by the on-site file archiving system. The major advantage of this system is the Mime cast File archiving solution.

Accessibility of Data

Various organizations have different approaches to file archiving, while some the files is stored on-site and some of them stored on-site which can make access of difficult data with ease. But the use file archiving system is that the data stored is not to be touched- it is crucial that the stored data can be made available to both the administrators and end users. When the data is stored in a single place the access of data can be made easily without any difficulty. On a cloud based system all the data is indexed before it is stored which allows easy searching of data across multiple applications. If an employee has to locate data from his iPad or an Blackberry device he can make use of cloud file archiving system solution which makes this possible.

Disaster Recovery

Another advantage of using cloud-based solution is that it allows on site disaster recovery for file archives. If the entire companies data is stored on site than the data can be easily vulnerable or compromised. In a cloud based solution, the servers are distributed around the world, so if one server fails and due to data distribution to various servers the data is secure in spite of failure of the current server or due to disaster.

Whatever archiving solution you choose for, remember that you should be able to archive large volumes of data which increases year by year; that the data which has been archived should be easily accessible and should be totally secure.

Wednesday 22 January 2014

AMD Released Warsaw Opterons With Lower TDP


Warsaw Opterons
AMD have officially presented two Warsaw Opterons 6338P and 6370P. As expected, both are specified with 99 Watt TDP, the clock rates are correspondingly lower than that of the 115 -watt models published earlier in 2012. Without much notice, AMD has released two new Opteron models namely 6338P and 6370P.

Both server processors are compatible with the LGA socket G34 and are at a TPD of 99 watts higher performance per watt than their offer Abu Dhabi predecessor mentioned. The new CPUs are identified by the suffix P, arrange themselves but apart from that in the existing Opteron 6300 - a naming scheme: The 6338P over clocked under load with 2.0 to 2.5 GHz and the 6370P reached 2.3 to 2.8 GHz.

Thus, the Warsaw models are the slowest 12 - and 16-core Opteron processors in the line-up, only the Opteron 6366 HE is clocked even more lower. The relatively low frequencies and the mature 32- nanometer manufacturing allow AMD to specify the Warsaw chips with 99 watts, thereby increasing the efficiency will be higher than the 115 -watt models.

Calculation with base clock at baseline provides the 6338P a meager 3 percent higher performance per watt than the 6344, with turbo is 12 percent. Compared to the Abu Dhabi Opterons; the Warsaw processors increased efficiency in 2P and 4P servers.

The Warsaw processors use the older Piledriver architecture, two so-called Orochi. This will be connected in the MCM process by HT links on a carrier. This also results in the four- channel memory interface, bringing the chips are well suited for RAM - intensive applications in a comparatively low server.

How to Access Computer with Android Mobile or iPhone

Access Computer with Android
In this world of technology, everything is possible with the help of these technologies. Most of you have tried to connect with your personal computer from the mobile and would have failed. But there is a fantastic way to connect your personal computer with your mobile very easily. In this post, I have shared an information regarding how to connect or access your files in your personal computer from the mobile itself. You can access the pictures, images and as well as the music files remotely from the mobile.

The best solution for this is easily done an application called PolKast. This application is a best application which can be installed in your mobile and by using this application; you can access the pictures, videos and music from your mobile.

Polkast is one of the best cloud services and it is fantastic; through which you can easily create your own personal cloud service with this mobile application itself. By using this pilkast application, you can select any size of file on your personal computer and you can share them using polkast applications. By using this polkast, you can easily access the files which have been shared in the polkast application, from your mobile itself. This polcast application can be also applicable for the Tablets and you can access those shares files from the tablet too.

In order to make the polkast app to work perfectly, we have to install the server app on the personal computer which you want to share and also the client application on the mobile device which may a mobile phone or a tablet. You can easily download any of these application from the polkast websites very easily for totally free of cost.

Steps to Remotely Access the Computers from your mobile:

-> Step 1: The first step is to download the PolKast in the personal computer where you need to share your files and access it from the mobile.

-> Step 2: Go to PolKast website; In the website, click over the Desktop option which is shown over the PolKast website.

 -> Once you have clicked that image, it will leads to you to the download page. Download the server version for your computer and install the application on your personal computer accordingly. Install the application in your personal computer and run the PolKast server app on your personal computer.

-> Register your account on the PolKast and once you have registered in the PolKast website. You will be directed to the main screen on the PolKast application, where you can choose various files from your personal computer which you need to be get remotely accessed from your mobile phones.

-> Now download the PolKast application in your mobile phone, and install it in your mobile phones.

 -> Once you have successfully installed the PolKast, you were asked to login in thePolKast.  

-> This will shows you the dashboard screen for your account, in which the shared files can be accessed from your mobile phones.

How to make your own Folder Icons in the Windows XP operating system

folder
Windows XP operating system is one of the best operating system which is installed in most of the devices in this universe. Because of its simplicity, the Windows XP operating system is considered as the best operating system in the world. You can even notice that the people who were using the Windows XP operating system would never go for the latest upgrades of the Operating systems. Because of the ease in the Windows XP operating system, the people used to stay in the Windows XP operating system.

There few tips that can be still used by the people who were using the Windows XP operating system. In this post I have share a bit of information for the Windows XP operating system, and in this I have discussed the steps how to make your own folder icons in the Windows XP operating system.

Generally, we used to store different kinds of files and informations in the each folder. But the thing is that, the icons for the folder will look similarly. If you were changing the icons according to the kinds of information which are stored in a folder, then we can easily access the informations very easily and quickly too.
The steps are given as below;

Step 1: Right click over the Folder which you need to change the Icons in the Windows XP operating system. This will show you pop-up menu in the screen.

Step2: In the pop-up menu, select the Properties in the Menu.

Step3: In the property window which you have selected, click the customize tab in the menu and also click on the change Icon button.

Step4: After clicking the Change Icon button, the pop-up box with series of icons and pictures is available for you. You can click on the any image you want and you can select the icons to be the Folder Icon for your Folder. This helps you to choose the Folder icon in the Windows XP operating system.

How to add extra Icons on the Icon Menu: 

If you want to use a custom image as your icon in the Windows XP operating system, you have to add your image in the %SystemRoot%\system32\SHELL32.dll.

-> In order to make your image as a custom icon, select an image which you want to make as icon. • Open an image editor application on your personal computer.

• Now crop the image into the size of 24 x 24 pixel or 16 x 16 pixel resolution in the image processor.

• Now save that image into 24-bit bitmap image from the image processor.

• Now repeat up to step-3 in the folder, and then you need the click on the browse button near the top of the image.

• You have to choose the image which you have changed into the bitmap format. Then select Ok button. Finally you have changed the custom icon in the Windows XP.

How to Connect All your Computers with Single Mouse and Keyboard

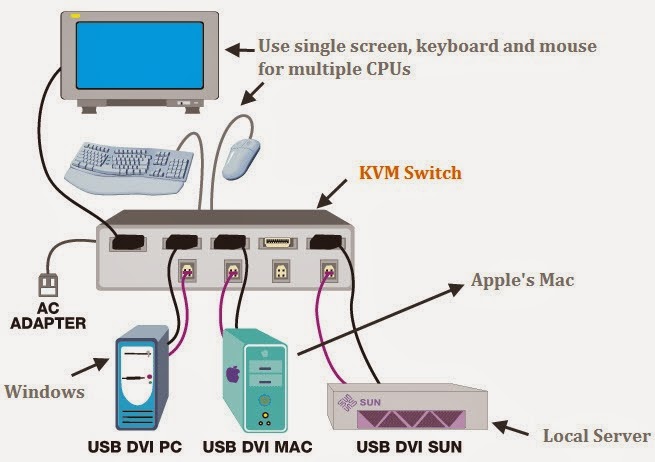
KVM Switch
Nowadays it’s a common thing having multiple Systems in their home like a Desktop and a laptop, Even there are a lot of people who work with two or say multiple desktop computers and its hectic to work with two mouse and two keyboards, Did you ever heard that we can actually operate multiple computers using a Single mouse and keyboard? Yes that’s possible using various methods, So here are a few methods which we can try to overcome that.

This can be done through hardware and software either ways but the important thing is the computers should be connected to each other via LAN or any Network connector.

1. KVM (Keyboard, Video, Mouse) switch, its hardware or say a cable in specific which will be a short one for keyboard, video and mouse. These are actually commonly used in Datacenters where lot of servers are placed in a single rack with a single keyboard, monitor and mouse. It will let you share a single mouse, keyboard and monitor across two or multiple computers. There is also KM switch cables using which you will be able to share a single keyboard and mouse with two computers that have two separate monitors. The best thing about using these hardware cables is they give really fast connections which makes it worth to go and makes the work more efficient. One of the main advantage of using KVM switch is that it saves space which would have been occupied if multiple keyboards, mouse are used.

2. If you don’t want to add any hardware cables there are a few software’s too which we can try, First thing to try out is Input Director, which is a Windows-only utility that’s easy to install and is totally free for non-commercial use. At first, you need to install this Input Director program on all your Computers. The computer that is physically connected by keyboard and mouse becomes the Master computer whereas the other systems will be Slave computers. Just make sure you never shut down the Master computer without turning off the Slave computers first because by doing that you will lose access to the keyboard and mouse which are physically attached to the master computer. There`s another program called Synergy , this one is a bit harder to setup than Input Director , but it’s free and a open-source thing which supports Microsoft windows, MAC OS and Linux. Both these programs are small ones which won’t eat up much resource your computers. On using both the software’s you don’t need to press any switches or buttons which was there in the case of KVM switches. Simply just move your cursor to drag drop or copy paste across your multiple computers in a easy manner. 

People who don’t mind spending for a peaceful computing will love to go for the hardware way and the Users who don’t like to spend money and want a clean desk without messing with cables will go the software way. Happy Computing.